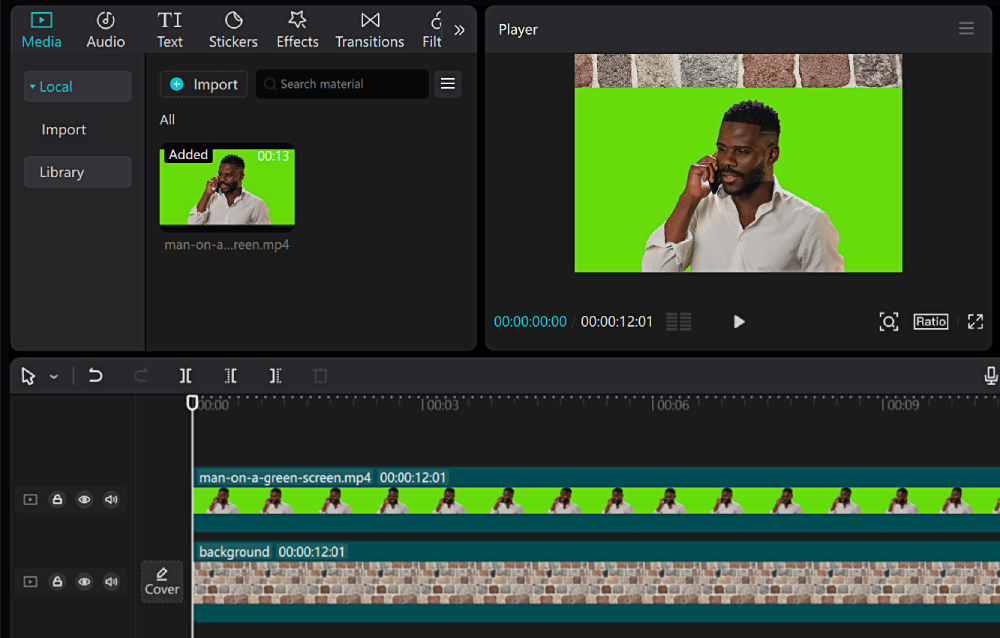
Are you ready to take look on How to Use Green Screen on Capcut? Have you ever wondered how to transport yourself to magical lands? Or to iconic places or even outer space in your videos? If so, you’re in for a treat! Welcome to the world of green screen editing with CapCut. You can unleash your creativity and bring your wildest ideas to life. Green screen technology lets you replace the background of your videos. You can use any image or footage you want. This turns an ordinary scene into an extraordinary adventure. You may want to star in an action movie. Or, report from the scene of breaking news. Or, add flair to your vlogs.
Table of Contents
What Is Green Screen on Capcut?
In CapCut, the “Screen” feature is a tool. It lets you replace the background of your videos with another image or video. Imagine you’re filming yourself in front of a plain green wall. With the Screen feature, you can change that plain wall into anything you want, like a beach, a city, or even space! It’s like magic for your videos. You also want to know about How to Remove Grimace Shake in CapCut.

Here’s how it works: First, you film yourself or someone else in front of a green background. In CapCut, you use the Screen feature. It tells the app to replace the green background with an image or video you choose. This creates the illusion that you’re standing in front of that new background. People use the Screen feature for all sorts of things. You want to make a video about dinosaurs and pretend you’re in a jungle. Or you want to give a weather report and stand in front of a map. With the Screen feature, you can make your videos more exciting and fun to watch.
How to Use Green Screen on Capcut?
- Upload your background clips to CapCut.
- Add the green screen video as an overlay.
- Select the color you wish to remove.
- Remove the selected color.
- Export the video.
- Add your background clips to CapCut.
- Choose the green screen video you like as an overlay.
Upload your background clips to CapCut:
Open the CapCut app and start a new project. Tap the button that says “Add” and select the background clips you want to use from your device’s gallery. These clips will be the scenes behind your main video.
Add the green screen video as an overlay:
Tap “Add” again and choose the video with the green screen background. This video should have the person or object you want to put into the background scenes.
Select the color you wish to remove:
After adding your green screen video to the project, tap on it in the timeline to select it. Look for an option that says “Chroma Key” or “Green Screen” and tap on it. This tells CapCut which color to remove from the video.
Remove the selected color:
Adjust the settings for the Chroma Key effect. You might see sliders for things like “Similarity” or “Tolerance”. Move these sliders until the green background starts disappearing. It should leave only the person or object from the video.
Export the video:
When you’re happy with how the green screen effect looks, tap on the “Export” button. Choose the quality and resolution you want for your video, then tap “Export” again. CapCut will process the video and save it to your device.
Add your background clips to CapCut:
If you haven’t already, open CapCut and start a new project. Tap “Add” and select the background clips you want to use. These will be the scenes behind your green screen video.
Choose the green screen video you like as an overlay:
Tap “Add” again and select the green screen video you edited earlier. Drag it onto the timeline above your background clips. Resize and position the green screen video as needed to fit with the background scenes.
Benefits Of Using Green Screen on Capcut
- Creative Freedom: It lets you place yourself or objects into any virtual environment. This gives you control over your videos.
- Professional Look: Green screen effects can make your videos look more professional. They do this by adding dynamic backgrounds or by removing distracting elements.
- Flexibility: You can shoot videos anywhere. You can still change the background later using green screen technology.
- Enhanced Storytelling: Green screen lets you improve your storytelling. It does this by taking viewers to different settings or scenarios.
- Cost-Effective: It eliminates the need for expensive sets or locations. This makes it an option for creating engaging content.
- Educational Purposes: Green screen technology is useful for education. It can be useful for making informative videos or immersive learning experiences.
- Versatility: You can use green screen effects for many kinds of content. These include vlogs, tutorials, presentations, and special effects in short films.
FAQ’s
How do you add an overlay to a green screen in CapCut?
Tap “Add” and select your green screen video. Then, choose “Chroma Key” to remove the green background. Finally, overlay it onto your background clips.
How do you make a CapCut video green?
Select the green screen video. Tap “Chroma Key” and adjust settings to remove the green color. Then, blend it with your background.
How do I edit a green screen video?
Choose your green screen video, tap “Chroma Key” to remove the green, then edit it like any other video.
How to do green screen on CapCut without green screen?
Use CapCut’s Chroma Key feature to remove a color like green, like blue, as if you had a green screen.
Conclusion
As you finish using CapCut for green screen editing, remember: you now have the power to make great videos. They will draw people in. By mastering green screen editing, you’ve unlocked endless possibilities. The only limit is your imagination. You are producing content for social media, education, or personal projects. The skills you’ve gained will let you tell your stories with creativity and flair. As you continue to explore CapCut’s features, experiment with them. Don’t fear to push the limits of what’s possible. Challenge yourself to innovate.


